New geteach.com Google Earth Projects: Dynamic Landscapes

[earth_disclaimer]

TL;DR: Google Earth Projects: Dynamic Landscapes (Link to Projects)

Figure: Dynamic Landscapes Main Menu

One of my favorite concepts to teach and think about is this idea of scale and how our landscapes constantly change. Google Geo has a couple of tools that help capture both these concepts. First, Google has organized years of remote sensing images from several vendors. Many students and teachers have used Google Earth Engine’s Timelapse and/or have used Google Earth Pro’s (Desktop) “Historic Imagery.” With these tools, viewers can see a changing landscape from above. For example, the images below, from Google Earth Pro’s Historic Imagery, visualize Warsaw Poland in 1935 and 1945. In addition, Google Maps, not Earth, has historic Street View going back, in some places, for 15 years.

Before imageAfter image

The goal of these Google Earth projects is to tell stories using these concepts of spatial and temporal scales. The four stories chosen to tell using these scales include the 2013 EF5 Tornado in Moore, OK; 2011 wildfires in Bastrop, TX; the 2011 Tōhoku Earthquake/Tsunami; and finally, the Notre-Dame Cathedral fire in Paris, France.

Figure: Damage Path EF5 Tornado Moore, Ok 2013

While these catastrophes are life altering to those living thorough these events, I find it, as a teacher, easier to create empathy in students when these events can shift between small-scale/small detail to large scale large detail. In other words, at a small-scale students can see the extent of how much was damaged, but might miss the personal stories of loss, heroism, and perseverance. Shifting the perspective to the large-scale/large detail of Street View gives a glimpse of these personal narratives. Hopefully facilitating the growth of an empathetic citizen willing to help their world.

Figure: Historic Street View – TX Highway 21 (Left Image: 2011 | Right Image: 2013)

On the technology side, there is a little of everything Google Geo has to offer. The stories themselves are curated Wikipedia and US government websites using data from NOAA, FEMA, Google Earth Imagery, and Google’s Street View. The visual format of the stories’ panels were created using custom HTML with help from Google’s Material Design Lite and a little JS to show/hide layers and style the media. The Google Earth Layers are all tiled (x,y,z) raster images either created using MapTiler or, in some cases, Google Earth Engine. The historic Street View panels are done using Google Maps API. And lastly Google Earth Studio was used to create the spinning Earth found in the Dynamic Landscapes’ Main Menu project.

Figure: Earth Engine 2013 Tornado Data – Source NWS

In other words, these stories are an experimental convergence of hacks. And while I think they look fantastic; they will always be amateur. However, these stories could look so much more polished, and scalable, with a couple of Google Earth for Web features. First, historical imagery and historical Street View that could be included in Google Projects. Second, toggle switch widgets for showing/hiding layers. Third, and one that I have been unable to hack yet, would be the ability to “set a scene” by enabling and disabling Map Styles like visible features (roads, places, poi), 3d imagery and clouds:) The ability to add ground overlays would also be useful to many users. This would remove some friction that is introduced with tile overlays. Lastly, and this will probably make no sense to anyone, but the ability to assign Ids to features like placemarks (points, lines, polygons), ground overlays (tiles), folders, full screen panels, etc. While I am at it…maybe the Earth Engine team could help me out with exporting video (x,y,z) tiles from Earth Engine’s code editor. Very selfish request.
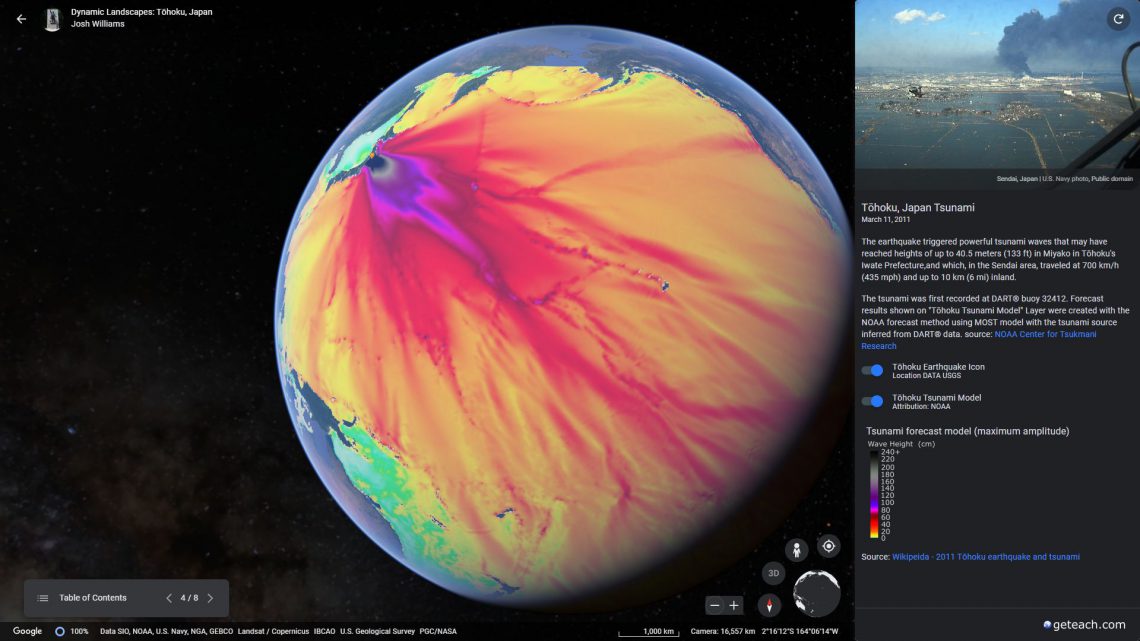
Figure: Tōhoku Tsunami Model – Source NOAA

Anyways, please let me know via Twitter or Facebook if you would like for me to create a tutorial on anything you found interesting within these stories. I truly enjoy creating and learning from these experiences.

What are El Niño and La Niña? Google Earth Project

[earth_disclaimer]

TL;DR What are El Niño and La Niña? Google Earth Project

I love finding informational U.S. government websites that fit the curriculum. In this case, and many others, NOAA created a page that does a really good job informing viewers about El Niño and La Niña (Link). What I enjoy about these sites is the opportunity to add value by transferring them into Google Earth stories. Now students can get the information in a package that allows for a bit more exploration. Or at least students get to push more buttons.

Anyways, please take if for a spin and share away if you think it will help student. Click here to open Google Earth Project: What are El Niño and La Niña?

If you are interested, here are some additional Google Earth Stories.

PSA: Teachers…If you are wanting to share this or other Google Projects with students and your school is a Google EDU campus. You might have to first share to your Teacher Workspace EDU account and then make a copy. (Three dot icon next to the trash can icon –> “Copy Project” Then share the copy to your students. Most EDU accounts do not allow for outside domain sharing. This puts a copy within your EDU Domain.

GeTeach.com Geo 4 Good 2021

[earth_disclaimer]

TL;DR: Here is a GitHub Repository for those who just want to see Earth’s Changing Oceans html, CSS, and JavaScript. (Link) Or make a copy of the demonstrated Google Earth Project. (Link)

It is always great to share Google Earth Project ideas at Geo for Good Summits. This year’s presentation utilized Earth Web’s new tile features along with folders. I originally wanted to create a post on how the demonstrated Google Earth Project was created, but I thought it would be better to create a simple project that uses the same basic ideas and structure.

The simple story created in this post is Austin and Las Vegas’ urban growth 2000 – 2020. This post will be a guide starting from creating and exporting map tiles using Google Earth Engine through the creation of an Earth Project using these tiles. Being completely unaware of people’s knowledge and skills, the lack of real time meaningful feedback, and the use of multiple platforms creates many challenges for this post. My hope is that the videos and code snippets help, but feel free to reach out. You can find me on Twitter @geteach.

Lastly, the typical disclaimer. I am a high school geography teacher and not a professional developer. Hopefully this tinkering adds value to whatever you are trying to create.


Table of Contents


I. Environment / Setting

  1. Google Chrome
  2. Google Cloud Storage
  3. Earth Engine – Code Editor
  4. Image Viewer – Any should work (IrfanView – Windows)
  5. VS Code
  6. All Tutorial Files used are in this GitHub Repository
  7. Patience

II. Setup Google Cloud Storage to House Map Tiles

  1. Create a bucket for the project
  2. Create paths to store Map tiles and other assets
    • Austin/2000
    • Austin/2020
    • LV/2000
    • LV/2020
Above Video: Set up Google Cloud Storage Folders

III. Create and Export Map Data Using Earth Engine

  1. Create cloudless map layers of Landsat 7 data
  2. Using bounding box to only save map data for Austin and Las Vegas
Above Video: Creating Earth Engine Maps

  1. Export the Map Tiles to Google’s Cloud Storage
Above Video: Export Map Tiles via Earth Engine

  1. Export the Panel Images to Google’s Cloud Storage
Above Video: Create and Export Panel Images

IV. Create Google Earth Project and Folder Structure

  1. Create New Google Earth Project
  2. Create full screen splash introduction placeholder
  3. Create Folders for…
    • Austin
      • Austin 2000
      • Austin 2020
    • Las Vegas
      • Las Vegas 2000
      • Las Vegas 2020
  4. Add Tiled Maps
  5. To get folder/feature IDs – Export Project as kml
Above Video: Structure Google Earth Story

V. Programmatically Control Earth Project Folders and Features (The Secret Sauce)

  1. Export KML
  2. Create hidden div for links
  3. Create JavaScript loop to show/hide features
Above Video: The Secret Sauce

VI. Create Introduction Splash Screen (Set the Presentation)

  1. Add image, title and description to introduction screen
  2. Set the “CLICK TO EXPLORE” button
  3. Copy/paste HTML into Google Earth Project
Above Video: Edit Introduction/Splash Screen

VII. Create 1st Panel within Austin Folder

  1. Edit Carousel, Text
  2. Set Features to hide/show
Above Video: Create Austin Panel and Set Map Overlays

  1. Set “Flyto” function for Austin Panel
Above Video: Add “Flyto” Function to Austin Panel

VIII. Create 2nd Panel within Las Vegas Folder

  1. Edit Carousel, Text
  2. Set Features to hide/show
  3. Set “Flyto” function for Las Vegas Panel
Above Video: Create Las Vegas Panel

IX. Tutorial GitHub Repository

GeTeach.com UI Refresh

Before imageAfter image

Swipe Right: New UI / Swipe Left: Old UI

It has been about five years since geteach.com’s last UI refresh. There are several issues that have been resolved. Watching students use the site in my classroom has brought on many of these changes, but some are just me wanting to tinker around. The most significant changes center around students using touch screens on their 11.6” Chromebooks.

Other changes have to do with scrolling of panels and creating a vertical split screen mode for modern, relatively large, smarty phones and/or tablets. As always, I am a one teacher shop that can only test on the devices that teachers can afford. So hopefully the new design works for your students. If not, the old version will be hosted here for the time being. https://geteach.com/back2020.html

Before imageAfter image

Swipe above image: New larger and on-hover highlighted buttons

Before imageAfter image

Swipe above image: “Select Map” menu has been reworked to better fit smaller screens

Before imageAfter image

Swipe above image: Close Streetview icon added to panel’s header

Before imageAfter image

Swipe above image: Added scrollbars to each panel to accommodate smaller screen sizes

Before imageAfter image

Swipe above image: The importance of scroll bars. Allowing students to work with varying window sizes

“Layers” automatically toggles on after clicking a map set

New vertical view option which might not help a lot in landscape on a computer, but…

..pretty handy in portrait mode on my Note 8 (image above) and/or a tablet in portrait mode

**Phone viewport must be wider than 385px**

GeTeach.com and ArcGIS API

In 2012, I ran into Joseph Kerski in San Marcos at the National Council for Geographic Education conference. The site created for my students, geteach.com, received an Excellence in Media award from the organization that year, and I have a distinct memory of a conversation in a small hotel room with Joseph, where he asked something along the lines of why I don’t use ESRI’s services. The truth is, I am a user and teacher of multiple GIS platforms, including QGIS, ArcGIS Online, Earth Engine, Google Earth, Google Maps, Google My Maps, and the Google Maps API. After several years of delay, I have finally started looking at ArcGIS’s JavaScript API.

First Draft https://geteach.com/arc/

What I like..

Please note that I’ve only spent a couple of weekends working on this new draft site: https://geteach.com/arc/. However, I already have some positive first impressions. Since the loss of the Earth API, I’ve dreamed of bringing a globe back into a website. The bonus with the ArcGIS API is that users can toggle between both 2D and 3D views.

First Draft https://geteach.com/arc/

I have mixed feelings about widgets, regardless of the service. They’ve always been nice and easy to work with, but there’s always something I’d like to change. While the compromises are minimal with the ArcGIS API, they still exist. From the documentation, it seems that a skilled developer could modify or create their own widgets. However, no high school teacher has time for that

First Draft https://geteach.com/arc/

The basemap options are fantastic. Eventually, once I figure it out, I will add the raster pyramid tiles and geoJson vector data I use in geteach.com. Loading the data does not look to be difficult. Like all the version of geteach.com, the menu system is going to take some time. Mashing together an API with a home grown UX takes more time than a couple of weekends for me. The basic UI framework is there. In addition, I have another former function that I would like to bring back to layers that will add some time to my development. Therefore, currently the only exploration of maps are ESRI’s basemaps….which are fantastic! Really enjoy the outline map next to a reference map!

First Draft https://geteach.com/arc/

What I miss…

Urgh! Street View. Street View is the primary reason I have not already experimented with the ArcGIS API. I do not believe there is one time when my class is using geteach.com that at least one student is not using Street View. Even if there is nothing in the activity having to do with Street View, someone has dropped Pegman into North Korea.

For this project, there are several widgets, including search, elevation, and measurements, which are easy to implement in the code. The main challenge is understanding how to start, stop, clear, and reset the widgets for both a 2D environment and a 3D world… MapView vs. SceneView.

First Draft https://geteach.com/arc/

Similar to Street View, Google’s imagery is far better than the available basemaps—at least the ones I’ve seen—when it comes to populated areas. Cultural landscape is a huge component of my human geography high school course, and Google’s imagery is often more detailed in this regard. ESRI’s services, however, seem to offer more complex 3D scenes, though this is not a default option.

Google Maps API Left | ArcGIS Imagery Basemap Right

Using an API key is not straightforward. I’m unsure how long this draft site will work because I don’t have a ‘pay as you go’ setup as a developer. One of the reasons I’m branching out to this API is because I had to remove the search location feature from geteach.com. One month, I received a $300 bill from Google’s Map Platform due to their Places API, the service for map search. I avoided the charge by disabling the feature. This is where most of my uncertainty lies—I have no idea how much this API will cost as I continue developing it, nor do I know how long it will work without a key.  

As always, the primary purpose of geteach.com is to provide a free site to help teachers educate and engage students using Google Geo Tools—no ads and no sign-in required. I see geteach.com as a gift to the curious who find value in these sites. As I mentioned earlier, I’m a high school teacher, so I apologize that it can’t be more.

Follow me on bluesky @geteach if you are interested in project updates.

updated 12/14/2024 minor edits and replaced “Follow me on Twitter” with Bluesky