You may have noticed a small pop-up on geteach.com recently asking if you’d like to “buy me a coffee.” I know…I know, nobody loves a donation prompt. As a teacher, I’ve always wanted this site to be a friction-less resource for the classroom.
However, after 15 years of building and maintaining this platform out of my own pocket, I want to be upfront about why that prompt is there, what the money covers, and why I’ve chosen this path instead of showing ads.
What it actually costs to run this
For a long time, I was able to keep costs very low. But as geteach.com has grown to over 1.3 million views and 300+ map layers, the technical requirements have changed.
Most months, the site costs me around $30–$40 to keep online. However, during high-usage months like this past March, that bill spiked to ~$106.00. There is no company subsidizing this, no ad revenue, and no investors. It is just a teacher covering the costs of a global classroom tool.
Here is exactly where that money goes:
What
Why
Typical Cost
Google Maps API
The engine behind the maps. First 10k loads are free; after that, Google charges per 1,000 views.
$0 – $70+/mo
Google Cloud Storage
Powers the 300+ custom map layers and data backups.
~$10/mo
Google Workspace
Keeps the site’s professional communication separate from my personal data.
$9/mo
Domain & Hosting
The “rent” for the geteach.com address and server space.
~$11/mo
Typical Total
~$35/mo
The philosophy: Why I don’t use ads
Most “free” tools for teachers aren’t actually free—they are often paid for by your students’ data. Companies harvest usage patterns and learning behaviors to share with third parties. This is a trend in educational technology that gives me concern.
If you’re not paying for the product, the product is usually your students.
I pay out of pocket specifically so I don’t have to do that. My deal is simple: you get a powerful, professional mapping tool, and your students’ information never leaves your classroom. No ads, no logins, no data mining.
A nerdy detail: How the pop-up works
For the CS and web development teachers: I wrote this prompt to be as private as the rest of the site. It uses localStorage to remember your preferences directly in your browser. Because I don’t use accounts and no data is ever sent to a server, the “thank you” flag follows the specific browser or computer you are using, not you as a user.
The logic is simple and designed to be a nudge, not a nag:
Clicking “Not right now” stores a timestamp that “snoozes” the prompt for 24 hours.
Clicking “Buy me a coffee” sets a flag that hides the prompt on that browser for one full year.
I chose a one-year window because the site’s fixed costs, like the domain and hosting, are billed annually. If you find geteach.com adds value to your students’ learning experience, a yearly donation is greatly appreciated and goes a long way toward making the platform self-sustaining.
Please keep in mind that because this is tied to your browser’s local memory, clearing your browser data or switching to a new computer will reset the flag. If that happens, there is no need to make a new donation; simply clicking the “Buy me a coffee” link again will reset the clock for that browser.
What happens if I don’t contribute?
Nothing changes. Every tool on geteach.com remains completely free and fully functional. The pop-up exists to make the costs visible, not to gatekeep the content. If you are a teacher and the budget isn’t there, please do not feel any pressure. Use the tool, teach the lessons, and enjoy the maps.
What your support actually does
When you buy me a coffee, you aren’t just buying me a drink—you are directly helping to pay the Google bill. You are signaling that a private, ad-free, and open educational web is worth keeping alive.
Thank you for 15 years of support, feedback, and map-viewing. Whether you can contribute or not, I’m glad you’re here.
Teaching AP Human Geography Unit 7 Topic 3 with Development Dashboards — geteach.com
This lesson uses geteach.com’s Human Development Index and Society mapsets to build a country-by-country development dashboard aligned to AP Human Geography Unit 7, Topic 3. Students collect social and economic indicator data for 19 countries across global regions, compare HDI change over time, and identify spatial patterns in development — all from a single platform, no login required.
AP Human Geography Unit 7, Topic 3 — Measures of Development
Geography for Life Standard 11 — Economic Interdependence
Geography for Life Standard 9 — Human Populations
Directions
Guiding Question: What are the social and economic measures of development?
Use geteach.com to collect indicator data for each country and complete the dashboard slides.
Open geteach.com and select your map using the Select Map button at the bottom right of each canvas.
On Map 2, enable the HDI layer — Select Map → Human Development Index — and keep it visible as your reference throughout the activity.
Using Map 1, record each country’s indicator data in its dashboard slide. Indicators are found in the Human Development Index and Society mapsets.
Fill in one indicator at a time across all countries — not one country at a time. This helps you spot spatial patterns and correlations with HDI.
On each dashboard, note how the population pyramid connects to the country’s DTM stage and development indicators.
Complete the processing questions at the end. All responses must include a because statement.
Indicators Collected for Each Country
GNI per Capita, Total Fertility Rate, Infant Mortality Rate, Life Expectancy, Physicians Density, Mean Years of Schooling, School Life Expectancy, Gender Inequality Index, Human Development Index (2021 and 2023)
Countries Included
Democratic Republic of the Congo, Ethiopia, Nigeria, Haiti, India, Indonesia, South Africa, Uzbekistan, Egypt, Brazil, Mexico, China, Russian Federation, Turkey, Italy, United States, United Kingdom, Australia, Germany
Why Complete by Indicator Rather Than by Country
Students fill in one indicator across all 19 countries before moving to the next. This is a deliberate instructional choice — it trains students to see spatial patterns and correlations across regions rather than treating each country as an isolated case. When a student fills in GNI per capita for all 19 countries at once, the global pattern becomes visible in a way that country-by-country completion does not produce.
Connection to Unit 2
This lesson pairs naturally with the Unit 2 Population Dashboard activity. The same 19 countries appear in both decks, so students can cross-reference demographic indicators like TFR and infant mortality with HDI scores and observe how population dynamics and development levels correlate across regions.
Teaching the Unit 2 dashboard first means students arrive at this lesson already familiar with each country’s population structure — its DTM stage, dependency ratios, and demographic pressures. That foundation makes the development indicators in this lesson more meaningful. A high youth dependency ratio is no longer just a number; it is a country students have already placed on the demographic spectrum.
Teaching AP Human Geography Unit 2 with Population Dashboards — geteach.com
This lesson uses geteach.com’s Demographics mapset to build a country-by-country population dashboard aligned to AP Human Geography Unit 2, Topics 3 and 4. Students collect demographic indicator data for 19 countries across global regions, interpret population pyramids, and assign DTM and ETM stages — all from a single platform, no login required.
AP Human Geography Unit 2, Topic 3 — Population Composition
AP Human Geography Unit 2, Topic 4 — Population Dynamics
AP Human Geography Unit 2, Topic 7 — Population Policies (previewed)
AP Human Geography Unit 2, Topic 8 — Women and Demographic Change (previewed)
AP Human Geography Unit 2, Topic 9 — Aging Populations (previewed)
AP Human Geography Unit 7, Topic 3 — Measures of Development (foundation)
Geography for Life Standard 9 — Human Populations
Where This Lesson Fits in the Unit Sequence
This dashboard is designed for Topics 3 and 4, but the indicators students collect naturally preview what comes later in Unit 2. Youth and elderly dependency ratios set up the discussion of aging populations in Topic 9. The Gender Inequality Index connects directly to Topic 8 on women and demographic change. And when students observe the wide variation in TFR and growth rates across countries, they are already asking the questions that Topic 7 — population policies — will answer.
The processing questions at the end of the deck are intentionally forward-looking for this reason. Rather than just summarizing what students observed, they ask students to consider how demographic indicators and population composition are shaped by government policies, economic development, and the changing roles of women — questions that bridge Topics 3 and 4 to Topics 7, 8, and 9.
The Bigger Picture — Bridging Unit 2 and Unit 7
There is also a longer arc built into this lesson that pays off later in the course. When students analyze dependency ratios alongside DTM stages, they are building an understanding of how population structure shapes economic capacity. A country with a high youth dependency ratio faces different development pressures than one with a rapidly aging population. That relationship — between population composition and development outcomes — is the conceptual foundation for Unit 7, Topic 3.
Teaching this lesson early in Unit 2 means that when students encounter HDI, GNI per capita, and measures of gender inequality in Unit 7, they already have a mental map of which countries carry which demographic burdens. The Unit 7 Development Dashboard lesson on this blog is designed as a direct companion to this one, using the same 19 countries so students can make that connection explicitly.
Directions
Guiding Questions: How do demographic indicators reveal patterns of population growth and decline? How does population composition reflect a country’s stage of development?
Use geteach.com to collect demographic data for each country and complete the dashboard slides.
Open geteach.com and select your map using the Select Map button at the bottom right of each canvas.
All indicators are in Select Map → Demographics (National). Keep Map 2 on a reference layer of your choice for regional comparison.
Fill in one indicator at a time across all countries — not one country at a time. This helps you spot regional patterns.
Calculate Doubling Time using the formula on the vocabulary slide: DT = 70 ÷ Growth Rate.
For each country, examine the population pyramid and assign the DTM and ETM stage based on the indicator data and pyramid shape — use the reference slides at the beginning of the deck.
In the top right cell, identify the sub-region’s predominant DTM stage using Select Map → Demographics (Sub-Regional) to compare patterns across the region.
Complete the processing questions at the end. All responses must include a because statement.
Indicators Collected for Each Country
Birth Rate, Death Rate, Total Fertility Rate, Rate of Natural Increase, Net Migration, Growth Rate, Doubling Time, Youth Dependency Ratio, Elderly Dependency Ratio, Gender Inequality Index
Countries Included
Democratic Republic of the Congo, Ethiopia, Nigeria, Haiti, India, Indonesia, South Africa, Uzbekistan, Egypt, Brazil, Mexico, China, Russian Federation, Turkey, Italy, United States, United Kingdom, Australia, Germany
A Note on DTM Stages
There is no single DTM layer on geteach.com — and that’s intentional for this activity. Students determine each country’s DTM stage by analyzing the demographic indicators and population pyramid shape together, which builds the analytical thinking the AP exam requires.
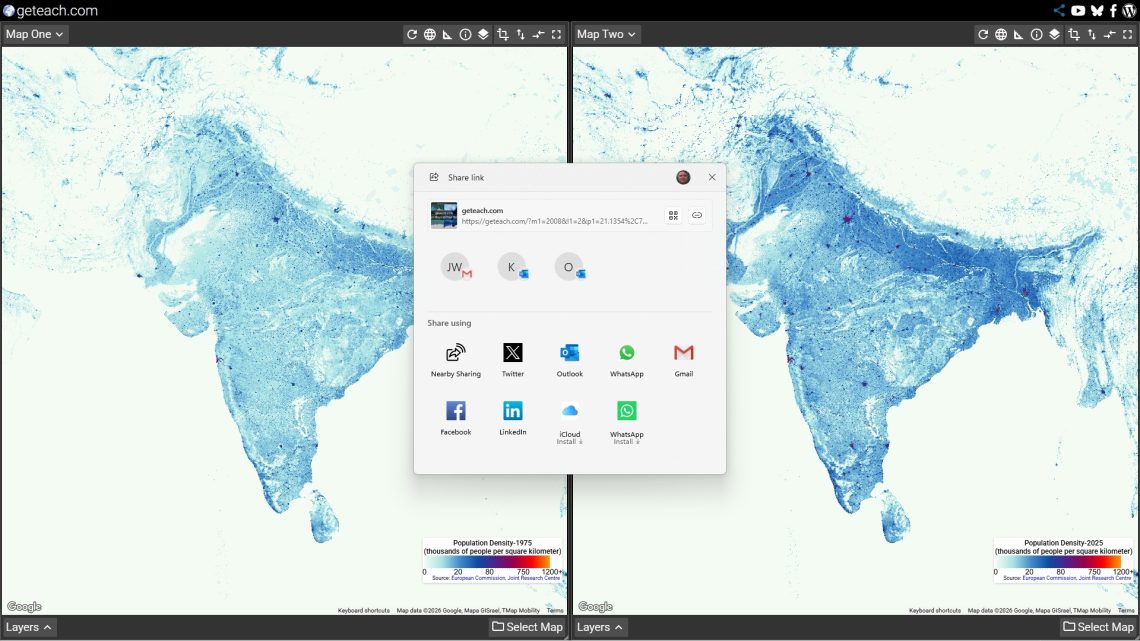
Three cities. Fifty years. One interactive map. The new Population Density layers on geteach.com let students click anywhere on Earth and see exactly how many people live in a 20km cell — and how that number has changed since 1975.
The Population Density layers (1975, 2000, and 2025) are now live on geteach.com, powered by the Global Human Settlement Layer (GHSL) from the European Commission’s Joint Research Centre. Students can place two maps side by side — say, 1975 and 2025 — click any location, and instantly see the population count, density per km², and a growth chart spanning five decades. Below are three locations that tell three very different stories.
Detroit, Michigan — The Shrinking City
Where to click: Center of Detroit, approximately 42.30°N, 83.23°W
Detroit is one of the most dramatic cases of urban population loss in the developed world. The city’s population fell from a high of 1,850,000 in 1950 to around 680,000 by 2015, and the decline has continued since. Detroit is currently about 65% smaller than it was at its peak, and has shrunk roughly 33% since the year 2000.
When students click Detroit’s inner city cells and compare the 1975 and 2025 layers side by side, the growth chart shows a persistent negative slope — most cells in the urban core register a total decline of roughly 8–15% from 1975 to 2025, with the southern portions running closer to 15–20%. These numbers are modest at first glance, but there is an important reason for that: Detroit’s sharpest and most catastrophic losses came before 1975. The GHSL dataset begins at 1975, which means the map captures only the tail end of one of America’s most dramatic urban contractions. By 1975, Detroit had already shed hundreds of thousands of residents from its 1950 peak. The 8–20% the map shows is the continuation of a decline that was already well underway.
This is a valuable teaching moment in itself — data always has a starting point, and what happened before that starting point matters. The map is honest about what it shows, but context is essential. A negative growth rate of even 10% sustained over 50 years represents real neighborhoods abandoned, real tax bases eroded, and real infrastructure left without users.
The causes are deeply geographic. The rise and fall of the automotive industry, white flight to the suburbs, highway construction that gutted urban neighborhoods, and the deindustrialization of the Rust Belt all left their mark. What makes Detroit particularly instructive on this map is the contrast between the city and its suburbs. Ask students to click not just the urban core, but the cells to the north and west. They will find those cells grew over the same period — population didn’t disappear from the region, it moved outward. That spatial redistribution is the real story the map tells.
Discussion questions
The map shows 8–20% decline from 1975–2025, but Detroit’s total loss since 1950 is over 60%. What does that tell you about using 1975 as a baseline?
Why might the suburban cells around Detroit show growth while the city core shows decline?
What geographic factors — highways, industry, housing policy — shaped where people moved?
What does a persistent negative growth rate tell you about a place’s long-term economic trajectory?
Where to click: Central New Delhi, approximately 28.66°N, 77.34°E
New Delhi sits at the opposite end of the population spectrum from Detroit. New Delhi has expanded by approximately 400% since 1975, reaching a forecasted population of over 31 million. The metro area population of Delhi in 2025 was estimated at 34,666,000, continuing to grow at over 2.5% per year.
When students click central Delhi cells on the 1975 vs 2025 dual map, the growth chart rockets upward — the total growth percentage (1975 – 2025) for dense urban cells in this area can exceed 300% to 500%. The density figures for the most built-up cells are staggering, among the highest on the planet.
But the more geographically interesting story is what happens when students click outward from the center. The inner city cells, already dense in 1975, show strong but bounded growth. The real explosion shows up in the cells to the west, south, and east of the historic core — areas that were largely agricultural or sparsely settled in 1975 and are now dense urban fabric. This is urbanization made visible and measurable.
Delhi has a rapidly growing population that nearly doubled from an estimated 18.6 million in 2016 to an estimated 34.6 million by 2025. That rate of change — doubling in under a decade — is almost impossible to comprehend from statistics alone. The map makes it spatial and real.
Discussion questions
Which cells show the highest growth rates — the inner city or the outer edges? What does that pattern tell you?
What push and pull factors drive migration into a megacity like Delhi?
How does rapid urbanization create challenges for infrastructure, housing, and the environment?
Where to click (inner city): Central Seoul, approximately 37.56°N, 126.85°E Where to click (suburbs): Gyeonggi Province, approximately 37.21°N, 127.04°E (Seongnam/Bundang area)
Seoul offers the most nuanced of the three case studies because it is actually two population stories happening simultaneously in the same metropolitan area.
Inner Seoul — stable to declining. Seoul’s population peaked at over 10 million and has gradually decreased since 2014, standing at about 9.6 million residents as of 2024. Students clicking the dense inner-city cells will find growth rates that are relatively modest compared to Delhi, and in some cells even slightly negative in recent decades. The density numbers are extremely high — Seoul’s urban core is one of the most densely populated places in the world — but the trajectory has flattened. Reasons for the population drop include high costs of living, especially housing, urban sprawl to Gyeonggi region’s satellite cities, and an aging population with an extremely low birth rate.
The suburbs — rapid growth. The story changes dramatically when students move their clicks outward into Gyeonggi Province. Satellite cities like Seongnam, Suwon, Goyang, and Yongin show steep upward growth curves on the chart. The Seoul metropolitan area has continued strong population growth, with the 2020 census indicating steady annual increases driven by suburban expansion. The Seoul Metropolitan Area as a whole has a population of 26 million as of 2024, ranked as the fourth-largest metropolitan area in the world.
This inner-decline / outer-growth pattern is called suburbanization or counterurbanization, and Seoul is one of the world’s clearest examples of it. The dual map is perfectly suited to showing this — students can place inner Seoul on map 1 and a suburban Gyeonggi cell on map 2, compare the growth charts side by side, and immediately see the spatial redistribution of population that defines modern Seoul.
Discussion questions
Why would people leave one of the world’s most connected cities for the suburbs?
How does a very low birth rate affect a city’s long-term population even if migration is stable?
Compare Seoul’s suburbanization pattern to Detroit’s. What is similar? What is fundamentally different?
Classroom Activity: The Population Comparison Challenge
This activity works for AP Human Geography (Unit 2 — Population and Migration, Unit 6 — Cities and Urban Land Use) and Geography for Life Standards 9 and 12.
Setup: Open geteach.com and load Population Density-1975 on Map 1 and Population Density-2025 on Map 2. Sync the maps so both canvases show the same location simultaneously.
Step 1 — Pick your city. Assign each student or pair one of the three cities above, or let them choose any city in the world.
Step 2 — Click and record. Click the urban core and record: total population (1975 and 2025), density per km², and the gTotal growth percentage shown in the chart.
Step 3 — Move outward. Click two or three cells progressively further from the city center. Record the same data. How does the pattern change?
Step 4 — Compare and explain. Using the data collected, ask students to write a geographic explanation: What pattern do they see moving from center to edge? What human or physical geographic factors explain it?
Step 5 — Cross-city comparison. Share results across the class. Build a comparison table: Which city grew fastest? Which shrank? Which shows suburbanization? What does that tell us about different development paths?
The population counts displayed come from the Global Human Settlement Layer (GHSL) P2023A dataset, produced by the European Commission’s Joint Research Centre. The raw data represents population counts at 100m × 100m pixel resolution. On geteach.com, these values are aggregated into 20km grid cells, giving students a total population estimate and a density figure (residents per km²) for the area around their click. Growth rates are calculated relative to 1975 as the baseline year.
The three epochs available — 1975, 2000, and 2025 — align directly with AP Human Geography Unit 2 (Population and Migration), which examines how and why population distribution changes over time, and Unit 6 (Cities and Urban Land Use), which asks students to explain the internal structure of cities, patterns of urban growth, and the forces driving suburbanization and urban decline. The layers also support Geography for Life Standard 9 (Human Populations) and Standard 12 (Human Settlement).
Throughout the years there have been a number of occasions where I simply wanted to share the map layers and location of what was on my screen. For example, I would have a compelling side-by-side comparison that I wanted to show a colleague or a student — but someone unfamiliar with geteach.com might have difficulty selecting the right mapset and toggling on the correct layers.
Recently, I solved this barrier by adding a share function to geteach.com. One click captures everything on your screen into a single URL. Anyone who opens that link lands in exactly the same state you were in — no setup required on their end.
What the Link Captures
The share function encodes the full state of both map canvases — a lot more than just the active layer. For each canvas it captures the active mapset and selected layers, the exact map position and zoom level, the map type (roadmap, satellite, hybrid, or terrain), visual style toggles for boundary lines, labels, and roads, and the visibility state of the legend, map controls, and drawing tools. It also captures whether the two canvases are synchronized by center and zoom.
This means a carefully arranged side-by-side comparison — Population Density on roadmap alongside Earth at Night on satellite, for example — is shared in its entirety. Both maps, both layers, both positions, all at once.
I would have a cool comparison that I wanted to share, but people unfamiliar with geteach.com might have a problem selecting the mapset and toggling on the layers. Recently, I solved this barrier.
How to Use It
Navigate to geteach.com, set up the view you want to share — layers, zoom, map type, any toggles — then click the Share button. On most browsers the link is copied directly to your clipboard and you’ll see the “Link copied to clipboard” confirmation. On mobile devices that support it, the native share sheet opens, letting you send the link straight to Messages, email, or another app.
Paste it wherever your audience will find it — a Google Classroom post, an email, a slide deck, a shared document. When they open the link, geteach.com restores your exact configuration automatically.
Examples in the Classroom
Here are four comparisons built with the share function — each ready to drop into a lesson or post directly to your LMS. Click the heading of each example to open the comparison in geteach.com.
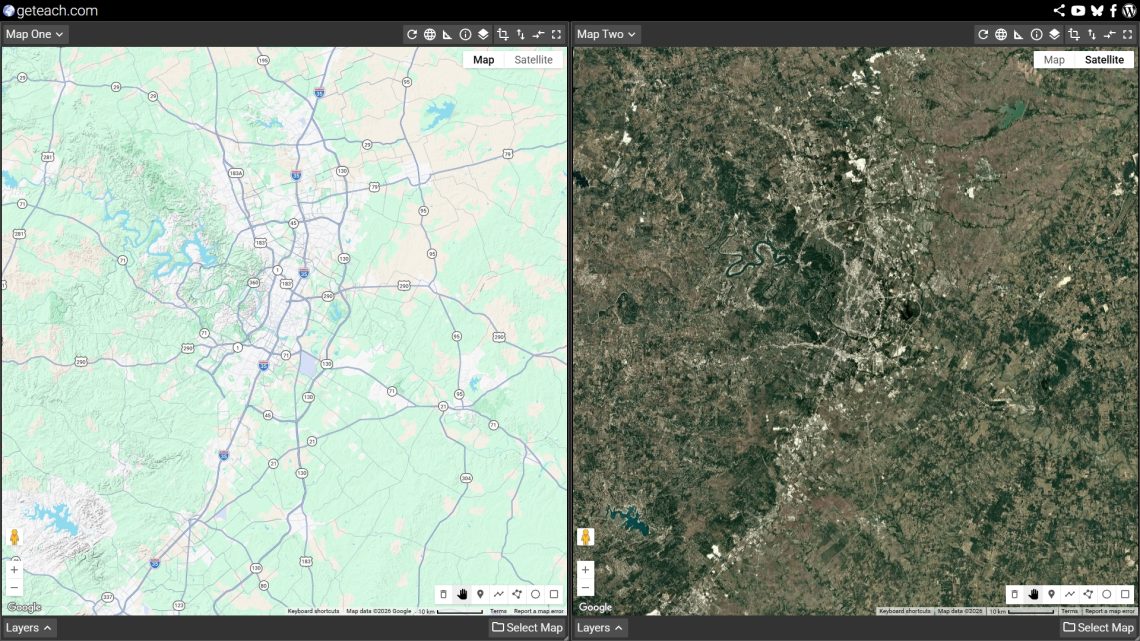
One canvas shows Austin on a terrain map; the other shows the same footprint on satellite. The city’s growth pattern runs strongly north–south — constrained to the east by the Blackland Prairie and to the west by the rugged Hill Country. This is a strong entry point for discussing how physical geography shapes site and situation, and why some cities grow in one direction rather than spreading evenly. Ask students: what physical features act as barriers here, and what draws development along the corridors you can see?
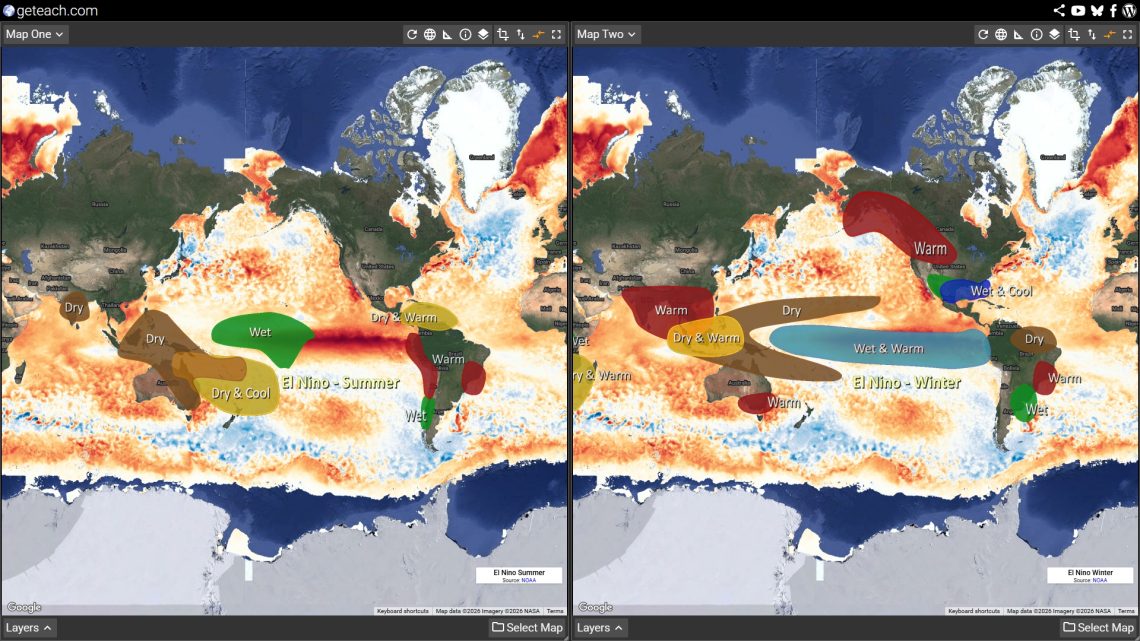
This comparison layers El Niño climate anomaly data for winter on one canvas and summer on the other, both centered on the Pacific. El Niño redistributes precipitation and temperature across entire continents — wetter winters across the southern U.S., drier conditions across Southeast Asia and Australia. Use this as a discussion starter for climate variability and food security: where do growing seasons shorten? Which regions face drought risk? How might shifts in precipitation affect crop yields in regions that depend on predictable monsoons? Students can also connect this to their own region and consider local impacts.
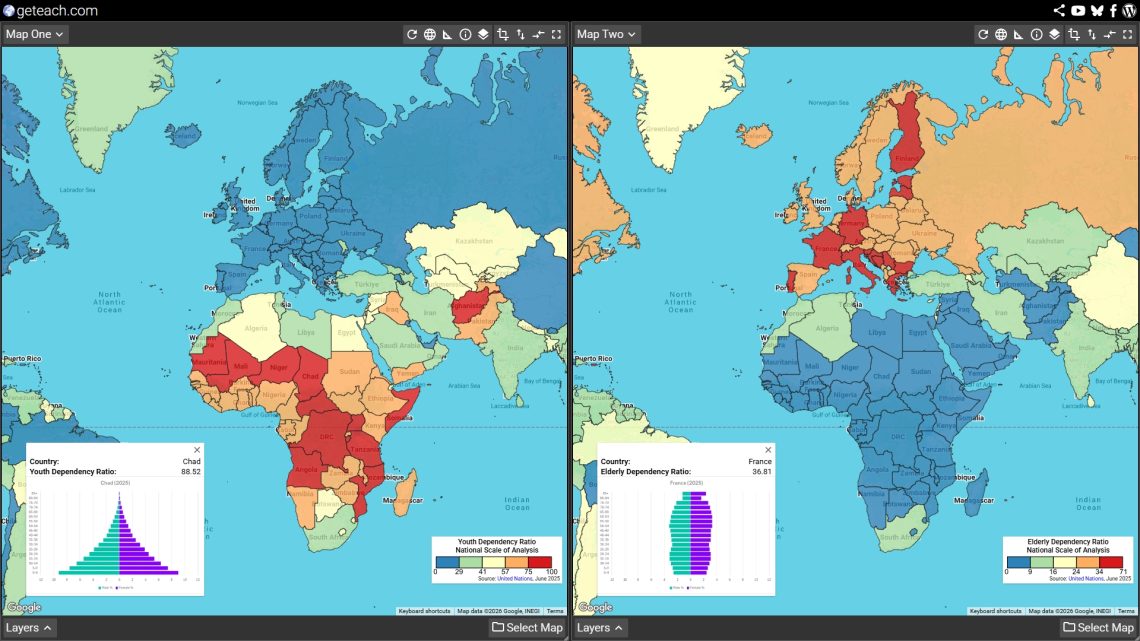
Youth dependency ratio on the left, elderly dependency ratio on the right — centered to show both Sub-Saharan Africa and Europe in a single view. The contrast is stark: much of Africa carries a high youth dependency burden while many European countries face the opposite pressure from aging populations. This is a natural entry point for demographic transition, social policy, and economic development. Ask students what each pattern implies for education spending, pension systems, labor force participation, and healthcare demand. Click individual countries for the underlying data — and don’t forget to pan to see how the patterns shift across regions.
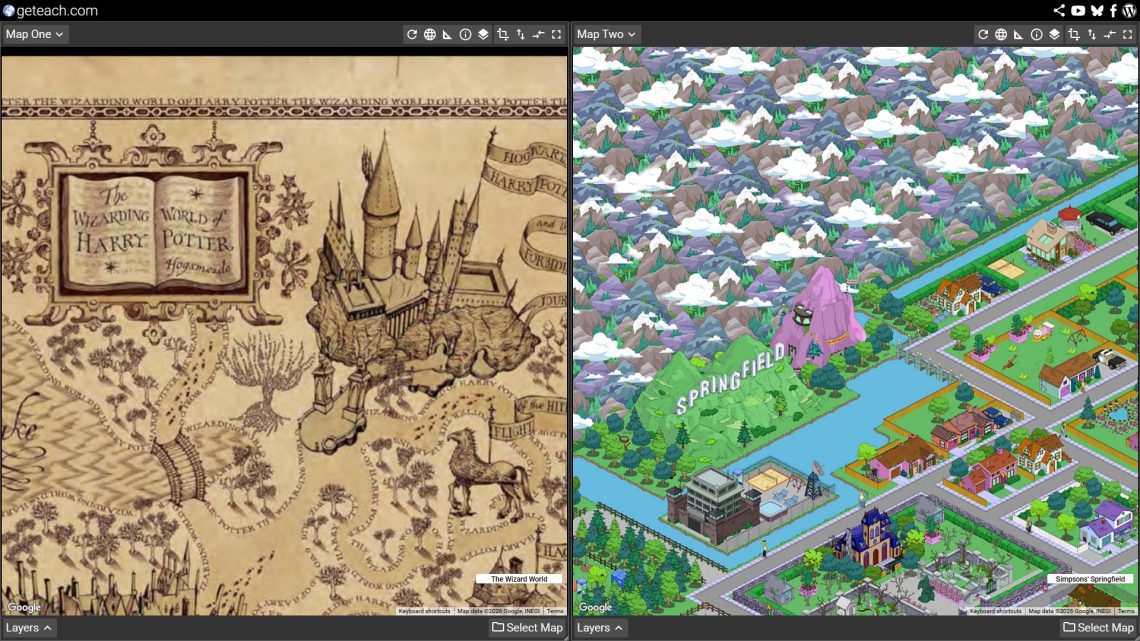
A few of the map sets include easter eggs hidden across the data layers. This one places Harry Potter’s Wizarding World on the left canvas alongside the Simpsons’ Springfield on the right. More of a reward for explorers than a lesson plan — but if you need an excuse, there’s a reasonable argument for a discussion about fictional geography and spatial imagination. Where do these places exist relative to the real world? Either way, students tend to enjoy finding these.
Share Your Comparisons — #geteachmaps
If you build a comparison worth sharing, tag it with #geteachmaps on Bluesky or Facebook. Whether it’s a side-by-side of HDI across decades, a terrain view of a region you’re studying, or just something that made a student say “whoa” — I’d genuinely love to see what people build with this.
And if you have ideas for how the share function could be more useful, reach out via Bluesky, Facebook, or email.

 Curated by Josh Williams @ geteach.com